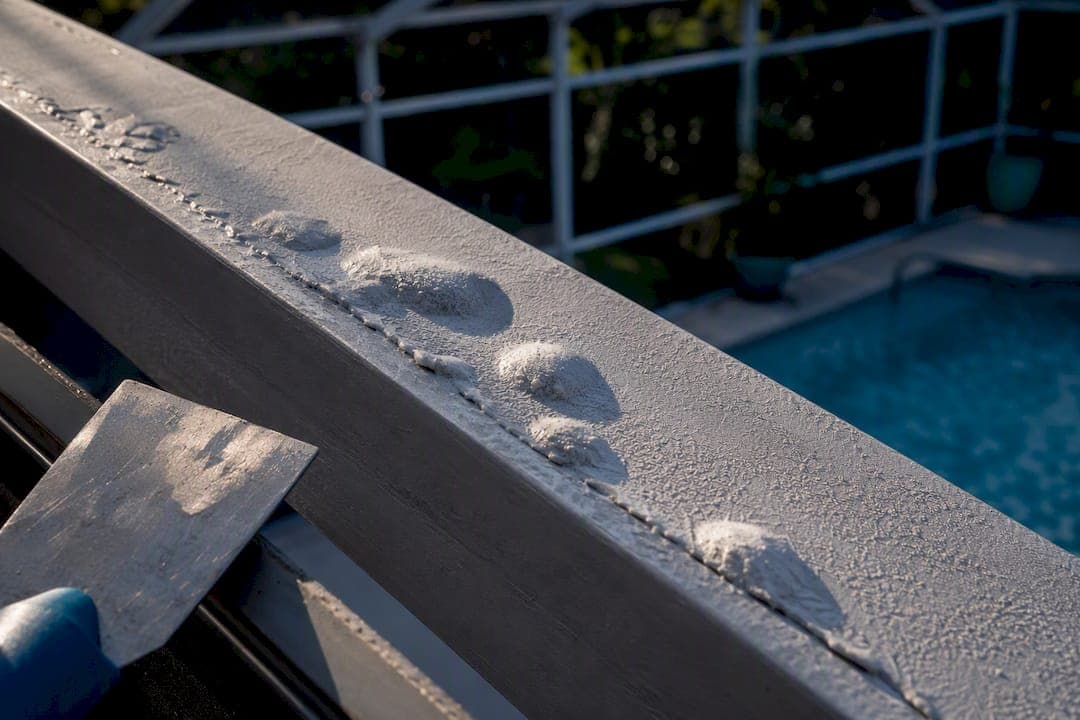
Bubbling paint on a pool cage almost always means moisture or corrosion trapped under the coating, not a cosmetic flaw you can paint over. Stop and inspect first: press on the raised spots, look for rust at the fasteners and joints, and treat the cause before any new paint goes on. Small, isolated bubbles near a few screws are often a weekend DIY fix. Widespread bubbling, pitting, or rust streaks usually call for professional restoration.
TL;DR:
- Small bubbles near screws or joints may be repairable with DIY patching, but widespread bubbling often indicates active rust or structural corrosion requiring professional attention.
- Trapped moisture, active rust, and poor surface preparation are the main causes of bubbling paint, with environmental factors like humidity and salt spray accelerating deterioration.
- Inspecting bubbles after a dry spell and probing their underside helps distinguish between application defects and active rust or moisture damage.
- Proper repair involves thorough cleaning, rust removal, fastener replacement, priming with a metal primer, and applying thin coats in ideal weather conditions to ensure longevity.
- Full restoration by professionals is recommended when bubbling involves extensive pitting, multiple panels, or corrupted fasteners, especially in challenging access situations or after repeated paint failures.
Table of Contents
- What Causes Pool Cage Paint Bubbling?
- Is It Bubbling or Blistering, and Is There Rust Underneath?
- How Do You Fix Bubbling Paint on a Pool Cage?
- How Do You Prevent Paint Bubbles From Coming Back?
- When Should You Hire a Professional Restoration?
- What Mr. Pool Screen Does Differently
- What Homeowners Get Wrong About Bubbling Paint
- Get Your Pool Cage Restored the Right Way
- Sources
- FAQ
What Causes Pool Cage Paint Bubbling?
Paint doesn't bubble for no reason. Something underneath it is pushing back, and it's almost always one of four things.
Moisture trapped beneath the coating is the most common culprit. Pool cages sit in a brutal environment: splash-back, rain, condensation, and humidity that never fully lets up. When water gets under a paint film and has nowhere to go, it expands with heat and lifts the coating off the metal. Florida's combination of sun, rain, and humidity is specifically called out as an accelerant for this kind of paint peeling and cracking on pool cages. Joints, screwheads, and seams are the usual entry points, since water collects at fasteners and joints faster than anywhere else on the frame.
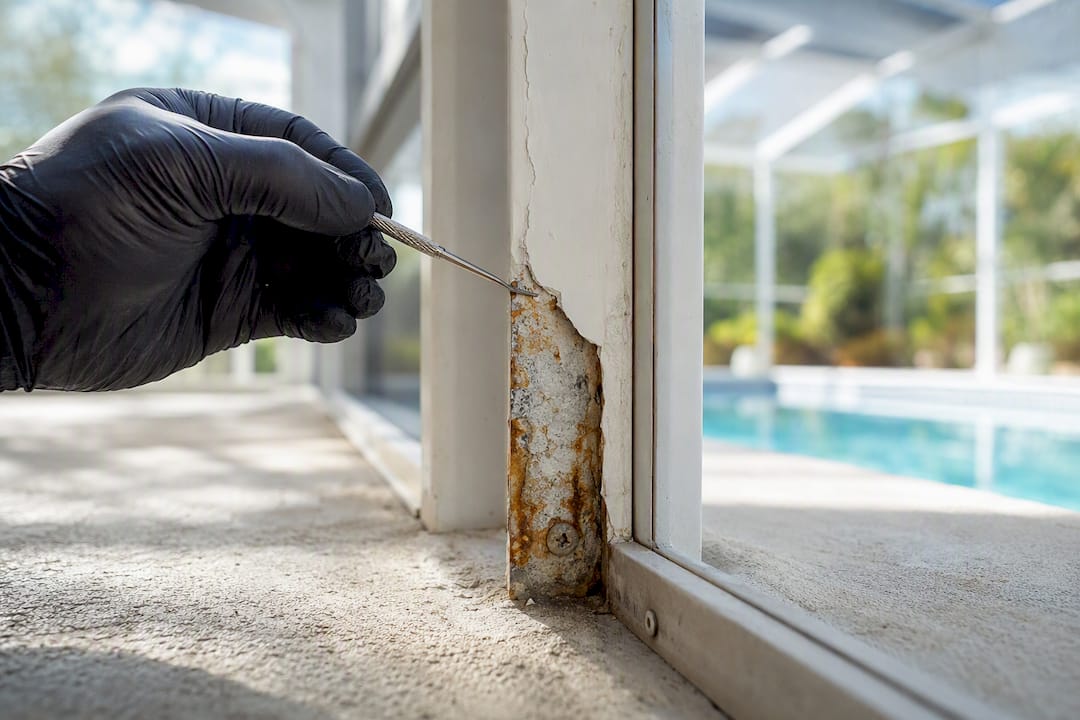
Rust and oxidation under the coating is the second big driver, and it's the one homeowners most often miss until the paint has already failed. As bare aluminum or steel corrodes, the oxidized layer expands and flakes. Paint applied over that active corrosion has nothing solid to grip, so it blisters upward as the rust keeps working underneath it. This is especially common at screws, hinges, and any spot where two metal pieces meet.
Poor surface prep causes a huge share of bubbling that has nothing to do with moisture or rust at all. Chalky oxidation on aged aluminum, leftover sunscreen or oil film, dust, and pollen all block paint from bonding. Skipping a degreasing step or a bonding primer is one of the fastest ways to guarantee a repaint fails early. Repainting over oxidized or chalking aluminum without cleaning and sanding first is a known shortcut to rapid failure, not a time saver.
Application errors round out the list. Coats applied too thick trap solvent underneath as the surface skins over, and painting in direct sun or high humidity keeps the film from curing evenly. A few specific triggers show up again and again:
- Painting directly over chalky, unwashed aluminum
- Skipping a metal primer and going straight to topcoat
- Applying one heavy coat instead of two thin ones
- Painting when humidity is high or the surface is hot to the touch
- Leaving old, failing paint in place instead of scraping it back
Environmental stress keeps the pressure on long after the paint dries. Pool chlorine, salt spray in coastal areas, and constant UV exposure all break down coatings faster than they would on a shaded fence or a garage door. A cage near a saltwater pool or within a few miles of the coast tends to show bubbling years sooner than an identical cage farther inland.
Is It Bubbling or Blistering, and Is There Rust Underneath?
Bubbling and blistering look almost identical from a distance, but the distinction matters for how you fix it. Blistering usually refers to small, evenly scattered bumps from heat or solvent trapped during application. Bubbling more often points to isolated pockets, and those pockets frequently sit right on top of active rust. Either way, the fix starts the same: get eyes and hands on the surface.
- Look at size and location first. Small, scattered bumps across a wide area suggest an application problem. Larger, isolated bubbles clustered near screws, hinges, or the base of the frame usually mean corrosion.
- Check for chalky white residue. Rub a finger across the paint near the bubbles. A powdery white film is oxidized aluminum, a strong sign that prep, not moisture, is the root issue.
- Probe a bubble gently. Press on it or scrape a small section with a fingernail or plastic scraper. If it flakes off in a dry, brittle chip, that's paint failure. If you hit soft, reddish brown material, that's active rust.
- Inspect every screwhead and joint. Pool cage frames fail at connection points first. Look for rust streaks bleeding out from under screws or brackets.
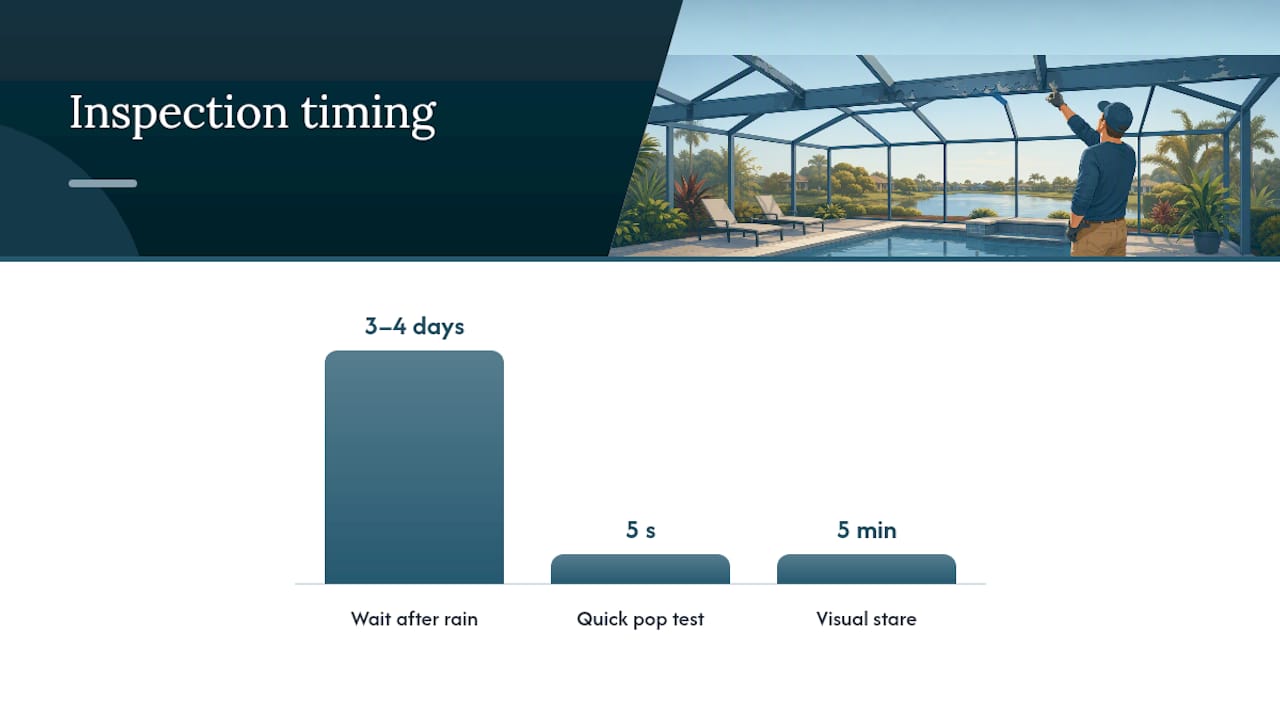
- Time your inspection after a dry stretch. Check the cage after three or four dry days, not right after rain. If bubbles are still soft or damp underneath, moisture is still trapped and hasn't finished doing damage.
Pro Tip: Carry a small flathead screwdriver during inspection. Popping a single bubble and looking at what's underneath tells you more in five seconds than staring at the surface for five minutes.
A handful of small bubbles with no rust and no soft spots is a candidate for a localized patch. Bubbling that runs along multiple panels, shows pitting, or reveals corroded fasteners is a different problem entirely, one where patching the paint just hides a structural issue that keeps getting worse underneath. A focused inspection that checks fastener integrity and pitting is usually the clearest predictor of whether you're looking at a cosmetic touch-up or a full restoration job.
How Do You Fix Bubbling Paint on a Pool Cage?
Fixing bubbling paint means removing what's failed, dealing with whatever caused the failure, and rebuilding the coating from bare metal up. Skip a step here and the same bubbles come back within a season or two.
Safety and setup first.
- Wear gloves and eye protection when scraping or sanding, especially overhead on the roof panels.
- Cover pool decking, the water surface, and any landscaping with drop cloths or plastic sheeting.
- Removing the screen mesh before painting is the professional standard, since it gives full access to frame members and prevents paint from sealing over joints where water collects. Masking around the screen instead of removing it is faster but raises the risk of trapped moisture at the very spots that failed the first time.
Step-by-step repair:
- Scrape and wire-brush all loose paint. Work back to a sound edge everywhere the coating lifts, flakes, or feels hollow when tapped.
- Feather the edges. Sand the transition between old paint and bare metal so there's no visible ridge. Feathering after stripping to a sound edge matters because an abrupt lip is a weak point where the next coat starts peeling first.
- Treat any corrosion you find. Mechanically remove rust with a wire wheel or sandpaper down to clean metal. A rust converter can stabilize light surface corrosion, but heavier pitting needs to be sanded out, not chemically masked.
- Replace corroded fasteners. Any screw showing rust bleed or a compromised head should come out. Stainless steel replacements resist the corrosion cycle that caused the original bubbling.
- Degrease and clean thoroughly. Wash the whole frame with a dedicated degreaser to strip sunscreen, pollen, and oxidation residue, then rinse and let it dry fully. Painting over a surface that feels dry but is still damp underneath is one of the more common ways a repaint fails within months.
- Prime bare and spot-repaired areas. Use a bonding metal primer formulated for aluminum or galvanized steel, not a generic all-purpose primer. Prime every fastener and every spot you sanded to bare metal, not just the largest bubbles.
- Apply the topcoat in thin, even coats. Spraying gives the most uniform, factory-like finish on the tubular frames and joints that brushes and rollers struggle to cover evenly, though it requires more masking and calm wind. Two thin coats beat one heavy one, and each coat needs its full recoat window before the next goes on.
- Respect cure time before reassembly. Don't rehang screen mesh or expose the frame to rain until the topcoat has fully cured, typically at least 24 to 48 hours depending on the product and weather.
A few mistakes account for most repeat failures:
- Painting over chalky oxidation without sanding it off first
- Skipping primer to save a step
- Painting in direct midday sun or right before rain
- Leaving even one corroded screw in place because it's hard to reach
- Reusing the same paint type that already failed once without asking why
Pro Tip: If you find rust at more than two or three fastener points, treat that as a signal to check every fastener on the structure, not just the visible ones. Corrosion rarely stays isolated to the spots you happened to notice.
Touch-up patches make sense when bubbling is limited to a few small, isolated spots with no active corrosion. Once you're dealing with multiple panels, structural pitting, or fasteners that crumble when you try to remove them, a full repaint (or a professional restoration) is the more honest answer, because patchwork over compromised metal just delays the same failure.
How Do You Prevent Paint Bubbles From Coming Back?
The right coating system, applied under the right conditions, is what separates a repaint that lasts five to seven years from one that bubbles again in eighteen months.
Coating system matters more than brand loyalty. A bonding primer designed for exterior metal, followed by a UV-resistant acrylic topcoat, is the combination that holds up best in a poolside environment. Water-based acrylic coatings are widely favored for pool cages because they flex slightly with temperature swings, resist chlorine exposure, and don't yellow the way some oil-based alternatives do over time.
Weather windows aren't a formality. Painting in direct sun causes the surface to skin over before the underlying layer cures, trapping solvent and setting up exactly the kind of blistering covered earlier. Aim for moderate temperatures, low humidity, and a calm, overcast day if you can get one. Correct weather windows and application technique affect how long a coating lasts more than most homeowners expect.
Application technique locks in the result. An airless sprayer covers the tubular frame joints and screen corners more evenly than a brush, and thin coats with proper dry time between them cure harder than one thick coat rushed to save time.
A short maintenance routine keeps small problems from turning into full bubbling events:
- Walk the cage twice a year and look for new chalking or hairline cracks
- Touch up small chips or scratches before they become entry points for moisture
- Check fasteners for early rust streaks, especially after storm seasons
- Rinse off chlorine and salt residue periodically if the pool is heavily treated or coastal
- Plan for a professional restoration once touch-ups start happening every few months instead of once a year
Florida's climate is unusually hard on exterior coatings compared to drier regions, which helps explain why pool cage paint longevity varies so much between a shaded backyard cage and one that takes direct sun and pool splash all day. The same moisture and heat cycle that causes bubbling on a pool cage also drives bubbling in interior wallpaper and drywall coatings, just at a slower pace indoors.
When Should You Hire a Professional Restoration?
Some bubbling is a Saturday fix. Some of it is a sign the whole coating system, and possibly the fasteners, needs professional attention.
A few red flags mean it's time to call a contractor instead of a hardware store:
- Bubbling spread across multiple panels or entire sections of the roof
- Visible pitting in the aluminum, not just surface chalking
- Corroded fasteners at more than a handful of connection points
- Two-story or steep-roof access that makes DIY scraping and spraying genuinely unsafe
- A repaint that's already failed once within a year or two
Professional restoration typically goes further than a cosmetic repaint. It generally includes a full inspection of the frame and fasteners, replacement of corroded hardware with stainless steel, spot or full-surface primer depending on condition, and industrial-grade coatings applied after fastener replacement, which tend to outlast a cosmetic-only paint job.
When you're comparing quotes, cost mainly comes down to four things: the size of the cage, how much corrosion needs to be addressed, how difficult access is (a two-story lanai costs more to work on than a ground-level pool cage), and what materials and warranty are included. A detailed cost breakdown for pool cage painting helps set expectations before you start calling contractors.
Before signing anything, ask each contractor: Do you remove the screen mesh for full access, or mask around it? What primer and topcoat system do you use, and is it rated for exterior metal? Are corroded fasteners replaced with stainless steel as part of the standard scope, or billed separately? What's covered under warranty, and for how long? A written scope should spell out surface prep steps, materials by name, fastener replacement terms, and the warranty period. Vague answers to any of those questions are worth treating as a warning sign.
What Mr. Pool Screen Does Differently
Restoration is Mrpoolscreen's entire focus, not a side offering tacked onto screen repair. The approach centers on a few specific choices that address the root causes covered above rather than papering over them:
- Water-based acrylic coatings formulated for exterior metal and poolside exposure
- Stainless steel and Nylotech fasteners to replace corroded hardware instead of leaving weak points in place
- A restoration process built around inspection first, treating bubbling as a symptom rather than a paint problem alone
- Cost savings compared to a full pool cage rebuild, according to the company's own project data
Homeowners weighing DIY against a full rebuild can see real before-and-after examples in the project gallery, which shows the kind of frame condition, fastener replacement, and finish quality involved in an actual restoration job rather than a quick cosmetic pass.
What Homeowners Get Wrong About Bubbling Paint
Most homeowners treat bubbling paint as a paint problem. It's usually a metal problem wearing a paint costume. The bubble is the symptom; the rust, trapped moisture, or bad prep underneath is the disease, and a new coat of paint over an undiagnosed cause is really just an expensive way to hide it for a year.
The conventional advice to "just sand it down and repaint" isn't wrong, exactly, but it skips the diagnostic step that determines whether sanding and repainting is even the right fix. A cage with three isolated bubbles and no rust is a different job than one with pitting at every third screw. Treating them the same is how a $200 weekend project turns into a $2,000 mistake eighteen months later.
If there's one thing worth prioritizing above the paint itself, it's the fasteners. They're small, they're easy to ignore, and they're almost always where failure actually starts. Check them first, every time, before you even think about primer.
— Michel
Get Your Pool Cage Restored the Right Way
If your pool cage has moved past a spot repair, patching the paint won't solve what's happening underneath, and a full rebuild is often more than the frame actually needs. Mrpoolscreen exists specifically for that middle ground: restoring an aging or corroded enclosure for a fraction of rebuild cost, using water-based acrylic coatings and stainless steel or Nylotech fasteners instead of a cosmetic paint job that fails again in a year or two.

That approach fits homeowners who are staring at bubbling paint, rusted screws, or a cage that's simply had enough Florida sun and rain to look its age, and who want a fix that addresses the metal, not just the finish. Every restoration starts with an inspection of the frame and fasteners, not a paint estimate, so you know exactly what's failing before any coating goes on. Browse the pool screen restoration services to see what's included, or reach out through Mrpoolscreen to schedule an inspection and get a written scope for your specific cage.
Sources
- Why Is The Paint Peeling On My Pool Cage — CyPaint
- Can aluminum pool enclosures be painted? — ShunShelter
FAQ
How Do You Fix Bubbling Paint on a Pool Cage?
Scrape and sand all loose paint back to a sound, feathered edge, treat any rust you find, replace corroded fasteners, then prime bare metal and apply the topcoat in thin coats. Skipping the rust treatment or the primer step is the most common reason a repaint bubbles again.
Is There a Difference Between Blistering and Bubbling?
Blistering usually shows up as small, evenly scattered bumps caused by heat or trapped solvent during application, while bubbling is often larger and isolated, frequently sitting directly over active rust. Both need the same first step: probe the spot and check what's underneath before deciding on a fix.
Does Bubbling Paint Mean There's Mold Underneath?
Not usually. Bubbling on a pool cage is far more often linked to trapped moisture, rust, or poor surface prep than mold, since the metal frame doesn't provide the organic material mold typically needs to grow. If you see dark, fuzzy growth rather than rust or bare metal under a bubble, that's worth a separate look, but it's not the typical cause.
Can Bubbling Paint Be Caused by Water Damage?
Yes. Water that gets trapped under the coating from rain, pool splash, or condensation is one of the leading causes of bubbling, and it often shows up worst near joints, screwheads, and seams where moisture collects and has nowhere to escape.