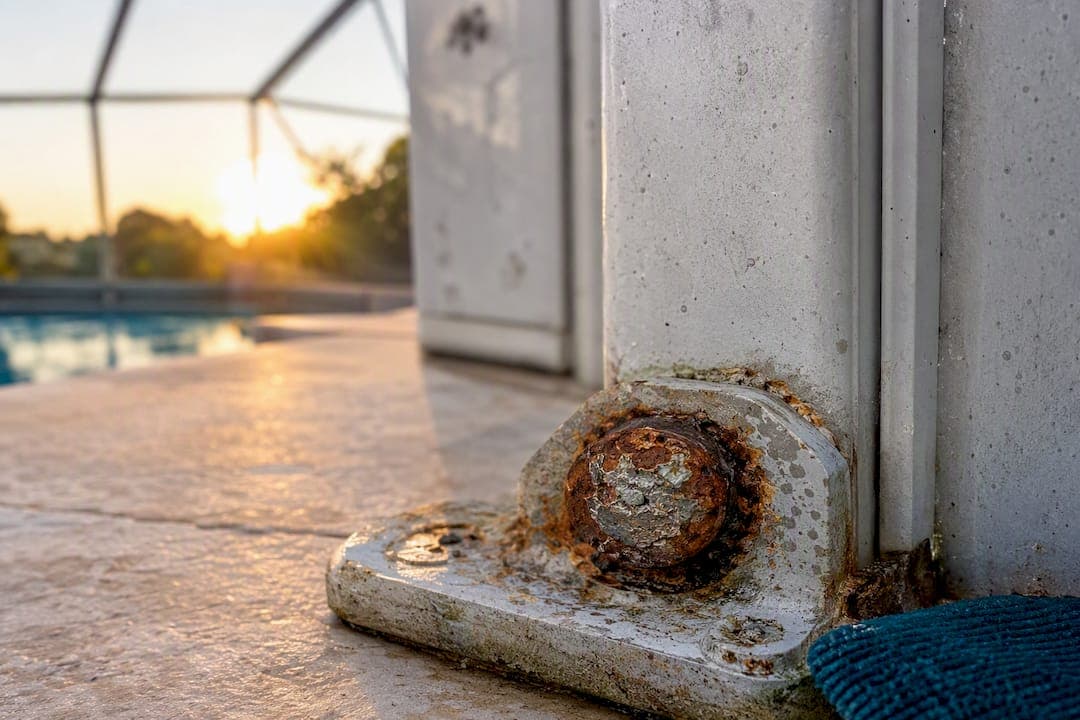
If you can see rust bleeding from an anchor point or wiggle a post at its base, treat it as a safety issue, not a cosmetic one. Inspect every anchor point this week, isolate any post with movement, missing fasteners, or metal loss, and stop using that section of the enclosure until it's fixed. Surface staining alone can usually wait; structural corrosion cannot.
TL;DR:
- Regular inspection and logging of each anchor point are essential, focusing on movement, missing hardware, corrosion, and concrete damage to prioritize repairs.
- Steel anchors rust primarily due to galvanic corrosion, environmental exposure, and installation damage, especially in salt or chemically harsh conditions.
- Replacing rusted anchors involves drilling, cleaning, and installing epoxy-set or mechanical fasteners, with proper torque and sealing to ensure durability.
- Using stainless steel or nylon-isolation systems can significantly extend the lifespan of anchors by preventing galvanic corrosion.
- Biannual inspections and immediate replacement of failed fasteners can save homeowners considerable costs compared to neglect or full replacement.
Table of Contents
- How Do You Inspect Pool Cage Anchors for Rust?
- Why Do Pool Cage Anchors Rust in the First Place?
- How Do You Replace a Rusted Pool Cage Anchor?
- What Prevents Pool Cage Anchor Rust Long Term?
- What Does a Professional Restoration Actually Cover?
- The Real Trade-Off Homeowners Miss
- Ready to Fix It? What Mr. Pool Screen's Restoration Process Looks Like
- Sources
How Do You Inspect Pool Cage Anchors for Rust?
Pool cage anchor rust rarely announces itself with a dramatic failure. It shows up first as a thin orange streak below a screw head, easy to dismiss as a stain from sprinkler water. That streak is the first sign steel is corroding somewhere it shouldn't be, and it only gets worse from there.
Work the enclosure systematically, one anchor point at a time, rather than eyeballing it from a distance.
- Look for visual clues. Rust streaks, dark staining on aluminum, pitting on fastener heads, or a white, chalky oxidation on the aluminum frame nearby.
- Do the wiggle test. Grip each post near its base plate and apply light side pressure. Any movement means the anchor has already lost its grip in the concrete.
- Check torque, carefully. A calibrated torque wrench can confirm whether a fastener is still seated to spec. Skip the impact driver here. It's built for speed, not precision, and it can strip threads or over-torque a stressed anchor.
- Inspect the concrete itself. Look for spalling, hairline cracks radiating from the anchor hole, or exposed aggregate and rebar. This kind of damage points to a structural issue that has maintenance guidance treating it as a red flag, not a paint problem.
- Photograph and log every problem spot. A phone photo with a date stamp turns a vague memory into a real maintenance record you can act on later.
Sort what you find into two piles: anchors that need attention now (movement, missing hardware, cracked concrete) and ones you can schedule for the next maintenance pass (light surface rust, minor staining). Our guide on fastener failure signs walks through what separates the two.
Pro Tip: Keep a simple spreadsheet with one row per anchor point, noting the date checked, torque reading, and photo file name. Most homeowners who skip this step end up re-inspecting the same suspicious anchor three times because they can't remember if it's gotten worse.
Why Do Pool Cage Anchors Rust in the First Place?
Anchors rust because they're almost never made of the same metal as the frame around them, and that mismatch is the whole problem.
Most pool enclosures use aluminum framing, which forms a thin, stable oxide layer that protects it from further corrosion. Steel fasteners don't get that benefit. Left exposed to moisture, they rust straight through, and the process speeds up dramatically when trapped water sits against the metal in a screw hole or base plate gap.
Three factors drive most of the damage homeowners see:
- Galvanic corrosion. When two different metals sit in contact with moisture between them, one corrodes faster to protect the other. Steel loses that fight against aluminum almost every time.
- Environmental exposure. Salt air, chlorine off-gassing from the pool, and Florida humidity all accelerate the reaction, which is why homes closer to the coast tend to see anchor failure years earlier than inland properties.
- Installation damage. A scratched coating or a nicked galvanized layer from the original install gives moisture a direct path to bare metal, and rust starts from that one weak point.
Curious how the metals interact at a molecular level? Our galvanic corrosion guide breaks it down further.
How Do You Replace a Rusted Pool Cage Anchor?
Once an anchor fails the wiggle test, you're choosing between two repair methods, and the concrete condition usually makes the decision for you.
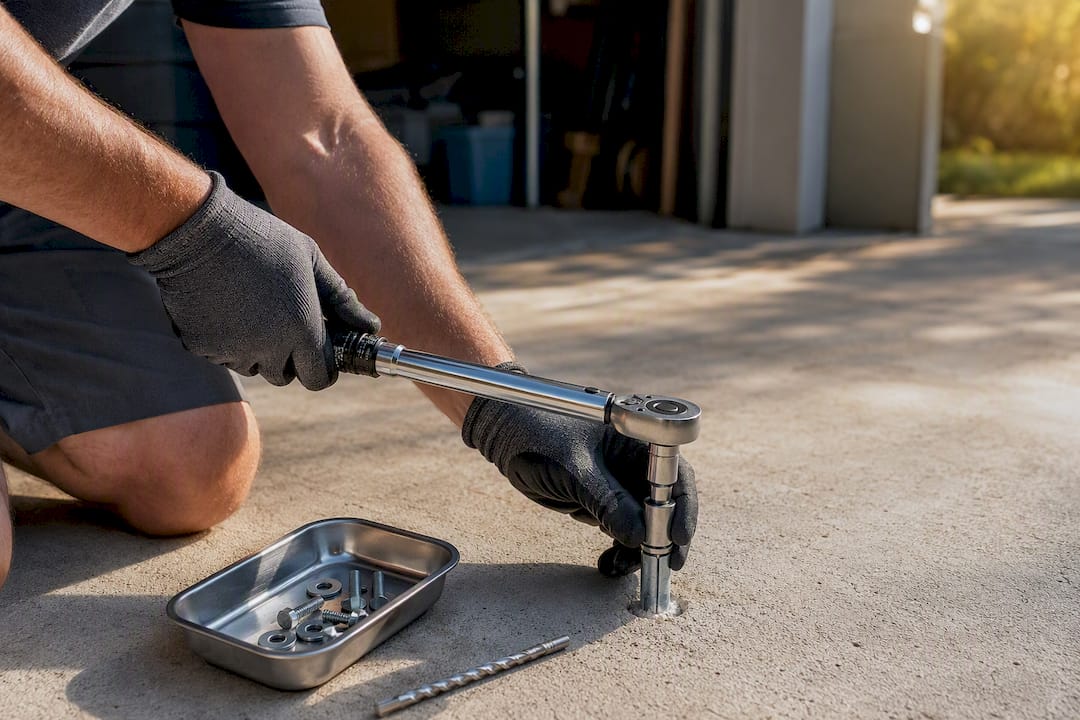
Epoxy-set anchors work well in solid, uncracked concrete. A threaded rod gets set into a drilled hole with structural adhesive, which cures into a bond often stronger than the surrounding concrete. Mechanical expansion anchors, like the Kwik Bolt TZ2 tested for cracked-concrete performance, rely on a mechanical bite instead of glue and hold up better where concrete already shows hairline cracking or where you need a faster, lower-mess install.
The DIY process itself follows a predictable order:
- Remove the failed fastener and old anchor completely.
- Vacuum the hole thoroughly. Leftover dust weakens both epoxy bond and mechanical grip.
- Inspect the hole edges for spalling before drilling any deeper.
- Drill to the exact diameter and depth the anchor manufacturer specifies. Guessing here is the single most common DIY mistake.
- Set the anchor and torque it with a calibrated wrench to the manufacturer's number, never by feel.
- Seal the perimeter with an appropriate compound to keep water out of the new hole.
Homeowners on pool forums frequently report exactly this sequence working for single, isolated anchor failures. The same threads are full of cautionary stories about spalled concrete that turned a $15 fastener swap into a bigger repair.
A single DIY anchor replacement typically runs under an hour once you have the right masonry bit and a torque wrench on hand, with material costs usually staying modest. Professional replacement costs more per anchor but comes with proper equipment, spec-matched hardware, and someone who's seen what happens when a shortcut fails. If more than a few anchors show movement, or the concrete itself is cracked, that's the point to call a contractor rather than keep drilling new holes next to old ones. For guidance on the base plate hardware around each anchor, see our base plate repair walkthrough.
What Prevents Pool Cage Anchor Rust Long Term?
The fastener you choose matters more than almost anything else in this equation. 316 marine-grade stainless steel resists the salt and chlorine exposure that destroys plain zinc-plated or galvanized screws within a few seasons. Nylotech and nylon-isolation systems go a step further, physically separating steel from aluminum so galvanic corrosion never gets a foothold in the first place.
Coatings matter almost as much as the hardware itself:
- Use a proper primer under any water-based acrylic coating rather than painting over bare rusted metal.
- Seal every penetration point where a fastener passes through the frame.
- Rinse the enclosure with fresh water regularly to clear salt and chemical residue before it sits and accelerates corrosion.
On schedule, check every anchor twice a year, tighten anything under spec, and replace a failing fastener the moment you spot it rather than waiting for the next inspection. Our weather damage prevention guide covers the seasonal side of this in more detail, and a general maintenance checklist approach applied consistently catches small issues before storm season turns them into structural ones.
Pro Tip: Do your pre-storm inspection a full month ahead of hurricane season, not the week before. That gives you time to actually order replacement hardware instead of scrambling.
What Does a Professional Restoration Actually Cover?
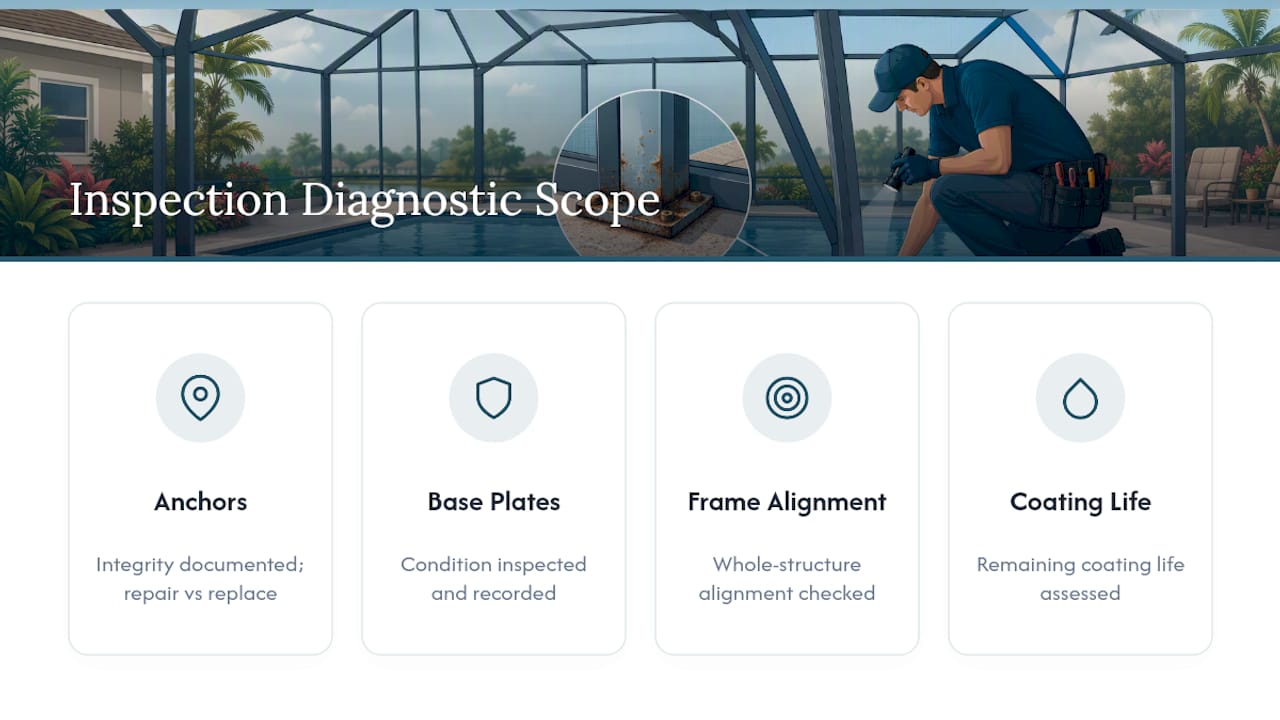
A professional inspection documents more than the homeowner checklist covers: anchor integrity, base plate condition, frame alignment across the whole structure, and how much life is left in the existing coating. That level of detail is what separates a guess from an actual repair plan.
Mr. Pool Screen's restoration work typically centers on replacing failing fasteners with stainless hardware, recoating the frame with water-based acrylic, and repairing anchors selectively rather than tearing out the whole structure. That targeted approach is why restoration can run up to 60% cheaper than a full rebuild, according to the company. When you're comparing quotes, ask exactly which fasteners get replaced, which coating system is used, and whether the estimate covers anchor repair or only cosmetic recoating.
The Real Trade-Off Homeowners Miss
Most advice on pool cage anchor rust treats every rust spot as either "ignore it" or "replace the whole cage," and that binary framing costs homeowners money in both directions. Plenty of enclosures get fully rebuilt when three bad anchors and a fresh coat of paint would've solved the actual problem. Just as many get patched piecemeal for years past the point where a contractor should have caught spalled concrete or a base plate that's lost its bite.
The inspection habit matters more than any single repair technique. A homeowner who checks anchors twice a year and replaces one failing fastener immediately will spend a fraction of what someone pays who waits until three posts wobble at once and the concrete underneath has already cracked. If there's one thing worth prioritizing over everything else in this article, it's the twice yearly check, not the material spec sheet.
Where the conventional wisdom really falls short is treating every rust streak as urgent. Surface staining on an otherwise solid anchor is a maintenance note. A post that moves under hand pressure is a safety issue. Learning to tell those apart, honestly, is worth more than any single product recommendation.
— Michel
Ready to Fix It? What Mr. Pool Screen's Restoration Process Looks Like
If your anchor inspection turned up more than a couple of problem spots, or the concrete around a post is already spalling, that's usually the point where DIY stops being the cheaper option. A professional service can replace rusted fasteners with stainless or Nylotech hardware, recoat frames in water-based acrylic, and repair anchor points selectively so you're not paying for a full rebuild you don't need.

An estimate typically starts with the same kind of inspection covered above, just done by someone who's checked hundreds of enclosures and knows what a failing base plate looks like before it fails completely. You can browse real before-and-after results in the project gallery to see what targeted restoration actually looks like on a finished cage. If your deck is showing wear alongside the enclosure, deck staining is worth folding into the same visit. The next step is simple: request a restoration estimate and get a real number instead of a guess.
Sources
The guidance above draws on fastener corrosion research from Blue Tap, anchor performance testing from SwimmerLiving, tool guidance from Kreg Tool, and restoration outcomes documented on the Mr. Pool Screen restoration page.