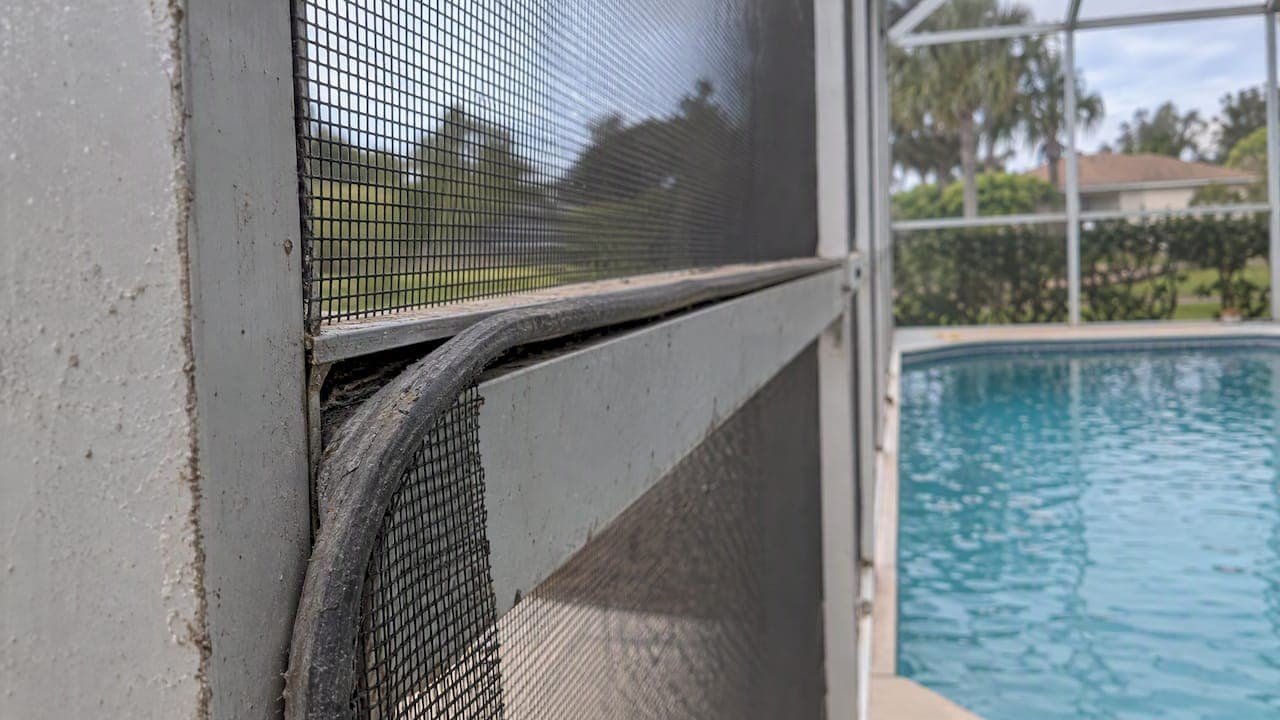
Screen spline doesn't actually shrink once it's cured in place, but it compresses and hardens in ways that feel like shrinking, and old vinyl spline really does lose diameter with age. The fix is simple: use new, correctly sized spline (commonly .140 or .160 inches), apply the rule that spline diameter plus two mesh thicknesses should exceed the channel throat, and trim excess only after the spline seats fully. If your frame is large, corroded, or oddly shaped, a pool screen restoration specialist like us at Mr. Pool Screen can help with the restoration.
TL;DR:
- Choose spline so its diameter plus two mesh thicknesses exceeds the channel throat by 0.010 to 0.030 inches; thicker mesh may need a smaller diameter.
- Measure the throat and groove at three or four points, use the largest reading, test fit actual mesh, and buy about 15% extra spline.
- Roll the mesh into the groove before inserting spline, avoid stretching it by hand, and trim excess only after checking perimeter tension.
- DIY suits a single window or door panel, while large pool enclosures, corroded frames, splayed lips, or repeat failures call for a specialist.
Table of Contents
- Why spline seems to change diameter or length during installation
- How spline diameter, mesh thickness, and the channel throat interact
- How to measure the frame channel and test-fit spline before you buy
- Should you cut excess spline? When and how to trim for a clean finish
- Installation technique: rolling, corners, and avoiding hourglassing
- How temperature, humidity, and UV exposure affect spline over time
- Preventive maintenance tips to extend spline life
- Spline materials: which ones shrink, harden, or hold up
- How different screen types hold up as spline ages
- When DIY makes sense and when to call a specialist
- A professional alternative for larger or problem frames
- FAQ
- Sources
Why spline seems to change diameter or length during installation
Vinyl spline doesn't shrink in the chemical sense, but it behaves like it does for two separate reasons, and mixing them up leads to the wrong fix.
The first is mechanical. When you roll spline into a channel, it gets compressed between the frame's lips and the mesh underneath. That compression pushes material outward along the groove, which can make the spline appear slightly longer when it's seated than it measured before installation. This is normal and expected, not a defect.
The second reason is aging. Vinyl spline that's been in the sun for a few seasons loses plasticizers to UV exposure and heat. The material hardens, gets brittle, and its diameter actually shrinks. Old spline pulled from a screen you're replacing has usually lost enough bulk that it no longer fills the channel the way it did new, which is why reusing it almost always leads to a loose, popping repair.
Tighter channels and thicker mesh make both effects more noticeable. A narrow throat leaves less room for error, so even small compression or hardening shows up as a mesh that won't hold. Heavier materials like pet-resistant or solar screen mesh take up more space in the groove on their own, which is why mesh thickness changes which spline size fits the same frame.
How spline diameter, mesh thickness, and the channel throat interact
Getting the fit right comes down to three numbers: the spline's diameter, the mesh's thickness, and the width of the channel throat that holds them both.
Residential screen spline typically runs from 0.125 to 0.250 inches in diameter, with .140 and .160 inches covering most standard window and door screens, according to Phifer's sizing guidance. Pool enclosures and other larger frames sometimes call for diameters up to 0.315 inches or a specialized shaped profile instead of standard round spline.
The working rule of thumb: spline diameter plus two mesh thicknesses should exceed the throat width by roughly 0.010 to 0.030 inches. Go much under that and the spline won't hold tension; go much over and you won't get the spline started in the groove at all.
Here's a worked example. Say your channel throat measures 0.170 inches. Standard fiberglass mesh is thin enough that .160 spline plus two layers of mesh clears the throat with room to spare. Switch to pet mesh, which runs noticeably thicker, and that same .160 spline now overfills the channel, making installation difficult and the fit uneven. Dropping to .140 spline restores the correct margin without changing anything else about the frame.

Some screen systems use flat or shaped spline profiles rather than round cross sections. Mixing a round spline into a channel designed for a shaped profile is a common source of creep and premature popping, so match the profile type, not just the diameter.
How to measure the frame channel and test-fit spline before you buy
Guessing at spline size is the single biggest cause of repeat repairs. A few minutes with calipers saves a second trip to the hardware store.
- Measure the channel throat width and the inside groove width with calipers at three or four points along the frame, since extrusions wear unevenly.
- Record the largest measurement you find, not the average, since that's the tightest fit your spline has to clear.
- If the old spline is crushed, flattened, or missing entirely, cut a short test length of new spline and press-fit it into the groove with a sample of the actual mesh you're installing.
- Measure the full perimeter of the frame and add about 15% for corners and waste when buying spline by length.
- On retractable screen systems, count the extra grooves the track requires, since those often take more spline than the visible frame suggests.
- If the frame has splayed lips or has been re-screened multiple times already, size up one notch to compensate for the widened channel.
According to Retract Wise's measurement guidance, spline sizes typically step in increments of about 0.015 inches, and one size can be the difference between a screen that holds and one that pops within a season. Test-fitting before you commit to a full roll avoids buying the wrong size twice.
Should you cut excess spline? When and how to trim for a clean finish
Cut the excess, but only once the spline is fully seated and you've checked the mesh hold around the entire perimeter. Trimming too early, before confirming tension is even on all sides, risks leaving a gap you can't fix without pulling the spline back out.
- Trim flush at each corner using clean, sharp snips rather than tearing or pulling the spline loose.
- Leave a small overlap where spline ends meet on long rails, so a future roller pass doesn't catch a frayed edge.
- If you left too much extra, either pull the section back out and re-roll it, or trim it neatly with a utility knife guided by a straight edge instead of cutting freehand.
A clean trim matters more than it looks. Frayed or overlapping ends catch wind and eventually work loose, undoing an otherwise solid installation.
Installation technique: rolling, corners, and avoiding hourglassing
Most popped spline and sagging mesh trace back to technique, not materials. A few habits make the difference between a tight screen and a loose one.
Pre-roll the mesh into the groove using the convex wheel on your spline roller before you force the spline itself into place. This seats the fabric evenly so it doesn't shift sideways once the spline goes in behind it, a technique professional installers rely on specifically because hand-tensioned mesh tends to distort unevenly under the roller.

Keep the roller moving continuously around corners whenever the frame allows it, rather than stopping and restarting at each edge. Use the blunt end of the roller tool to press spline fully into tight corners, where a rushed pass often leaves a gap that shows up as a loose bulge later.
Don't pull or stretch the mesh by hand before rolling. Let the roller's own pressure create even tension as it pushes spline into the groove. Hand tension is inconsistent from one spot to the next, and that unevenness is exactly what causes hourglassing, where the mesh pulls tight in the middle and sags at the edges.
If a channel is genuinely too tight no matter how carefully you work, drop to the next spline size down rather than forcing an oversized spline through. On frames built for a shaped profile, switch to that profile instead of substituting round spline.
Pro Tip: Roll a short test section with your actual mesh and spline before committing to a full panel, since testing beats re-rolling an entire screen.
How temperature, humidity, and UV exposure affect spline over time
Spline that looks fine on installation day doesn't stay that way forever, and outdoor exposure is the main reason why.
Heat cycling is the biggest factor. Vinyl spline expands slightly in direct sun and contracts again at night or in cooler weather. Repeated cycling, season after season, gradually drives plasticizers out of the material, leaving it stiffer and smaller in diameter than it started.
UV exposure accelerates that same process. Spline on south or west facing panels, which get the most direct sun, typically hardens and shrinks faster than spline on shaded sides of the same enclosure. That's why one section of an older screen can feel loose while another section on the same frame still holds tight.
Humidity plays a smaller but real role. Vinyl absorbs a small amount of moisture in humid climates, which can cause minor swelling, while dry conditions pull moisture back out. The swings are small compared to heat and UV effects, but they add to the overall wear on spline that's already aging.
None of this is something you can install your way around. It's a function of time and sun exposure, which is why spline that held perfectly well for several years can suddenly need replacing even though nothing about the installation itself changed.
Preventive maintenance tips to extend spline life
Spline isn't maintenance-free once it's installed, but a few habits slow down the hardening and shrinking that eventually require a re-screen.
Rinse screens periodically to clear dust, pollen, and salt buildup, especially near coastal areas, since grit trapped against the spline groove accelerates wear on the material. Avoid pressure-washing directly into the channel, which can drive water behind the spline and loosen its seat over time.
Inspect spline at the start of each season, running a finger along a few feet of groove to check for brittleness or gaps. Catching a hardened section early lets you re-roll just that stretch instead of waiting for the whole panel to fail.
Keep nearby vegetation trimmed back from screens that get constant shade, since shaded panels often trap more moisture and debris than sun-exposed ones, even though they age more slowly from UV.
When you do notice a section going loose, replace that spline promptly rather than patching around it. A single weak section puts extra strain on the spline next to it as wind load shifts, which can speed up failure across the whole panel. For enclosures with corroded screws or splayed frame lips contributing to the problem, addressing fastener issues alongside the spline may help reduce the risk of repeat repairs.
Spline materials: which ones shrink, harden, or hold up
Most residential and pool enclosure spline is extruded vinyl, chosen because it's flexible enough to roll into a groove and firm enough to hold mesh under tension. Standard vinyl spline is also the material most prone to UV-driven hardening and shrinkage over several years outdoors, which is the behavior most of this guide addresses.
Some manufacturers offer UV-stabilized or heavier-duty vinyl spline aimed at high-exposure installations like pool cages and screened lanais. These formulations resist plasticizer loss longer than standard spline, though they still harden eventually under constant sun.
Rubber spline shows up on some older or specialty installations. It tends to resist cracking better in cold climates but can be stiffer to work with during installation and is less commonly stocked than vinyl at most hardware retailers.
Shaped or proprietary profile spline, used on certain retractable and track-based systems, is typically a harder vinyl compound by design, since it needs to hold its cross-sectional shape under the track's own tension mechanism rather than relying on a round spline's compression fit. Matching the profile, not just swapping in round spline of a similar diameter, matters more for these systems than for standard framed screens.
How different screen types hold up as spline ages
Standard window and door screens, with narrow aluminum channels and lightweight fiberglass mesh, tend to show spline problems first as a loose corner or a small bulge, since the channel has little margin for a shrinking spline to begin with.
Pool enclosures face a tougher combination: larger panels, more linear feet of spline per section, and heavier mesh options like pet-resistant or solar screen that demand a properly sized groove from the start. A cage that was re-screened years ago with standard spline sized for lighter mesh is a common setup for repeat failures, since the undersized spline simply can't hold the thicker material once it starts to harden.
Retractable screen systems add another layer of complexity, since their track-based channels often use shaped spline profiles rather than round stock, and those channels can be less forgiving of a size that's even slightly off.
Across all three types, the underlying cause of shrinkage, which is UV and heat exposure, is the same. What changes is how much margin each system has before that shrinkage turns into a visible problem, and pool enclosures, with their larger surface area and heavier mesh demands, generally show issues sooner than a small window screen does.
When DIY makes sense and when to call a specialist
A single window screen or storm door panel is a reasonable DIY project if you can measure the channel accurately, have access to a spline roller, and test-fit a short sample before committing to the full run.
Large pool enclosure panels, frames with corrosion or splayed lips, or screens that have already been re-screened more than once are a different situation. Repeated spline failures on the same frame usually point to a sizing or hardware issue that's easy to miss without addressing the underlying sagging or distortion first. A specialist can also supply correctly sized shaped or proprietary profiles that aren't always available at a general hardware store, along with hardware built to outlast another DIY patch.
— Michel
A professional alternative for larger or problem frames
When a pool cage has corroded fasteners, splayed channels, or a history of repeat spline failures, getting the sizing and hardware right matters more than saving a weekend. Our restoration process is built around that: stainless steel or Nylotech fasteners in place of corroded hardware, and careful masking so coatings go where they belong.

- We replace rusted or failing fasteners with stainless steel or Nylotech hardware as part of the restoration.
- We restore pool screens as part of our pool enclosure restoration service.
- Our restoration work comes with a warranty. Contact us for details, and ask for an estimate to compare the cost with a full enclosure rebuild.
If your pool enclosure keeps losing spline or mesh no matter how carefully you re-screen it, request an estimate for pool screen restoration and let us handle the sizing and hardware for you.
FAQ
What are the different sizes of spline available?
Residential screen spline most commonly comes in .140 and .160 inch diameters, with a broader range from 0.125 to 0.250 inches covering lighter and heavier applications. Pool enclosures and specialty track systems sometimes require diameters up to 0.315 inches or a shaped profile instead of standard round spline.
Which side of the window screen faces out?
For fiberglass and most aluminum mesh, either side can typically face out since the weave is symmetrical, but check the manufacturer's installation instructions for your specific mesh. Some specialty meshes, like certain solar or pet-resistant screens, have a textured or coated side meant to face outward.
What can you use instead of spline?
Spline is the standard method for holding mesh into a screen frame channel, and there isn't a reliable drop-in substitute for a framed screen repair. Some retractable or clip-based screen systems avoid spline entirely by design, but converting a spline-channel frame to a different holding method generally isn't practical for a DIY repair.
How do you remove old spline from a screen?
Pry up one end of the spline with a flathead screwdriver or spline removal tool, then pull it out of the groove along the full perimeter. Old spline that's hardened from UV exposure often breaks into pieces during removal, which is normal and doesn't indicate anything wrong with your technique.
Why does spline seem to shrink after installation?
Spline doesn't chemically shrink during a normal installation. What you're seeing is either mechanical compression as the roller seats it into the channel, or, in older spline, UV and heat-driven hardening that reduces its diameter over several seasons of outdoor exposure.
Sources
- How To Choose The Right Size Of Screen Spline | Phifer
- Spline Size Guide: How to Measure Screen Spline and Channel | Retract Wise