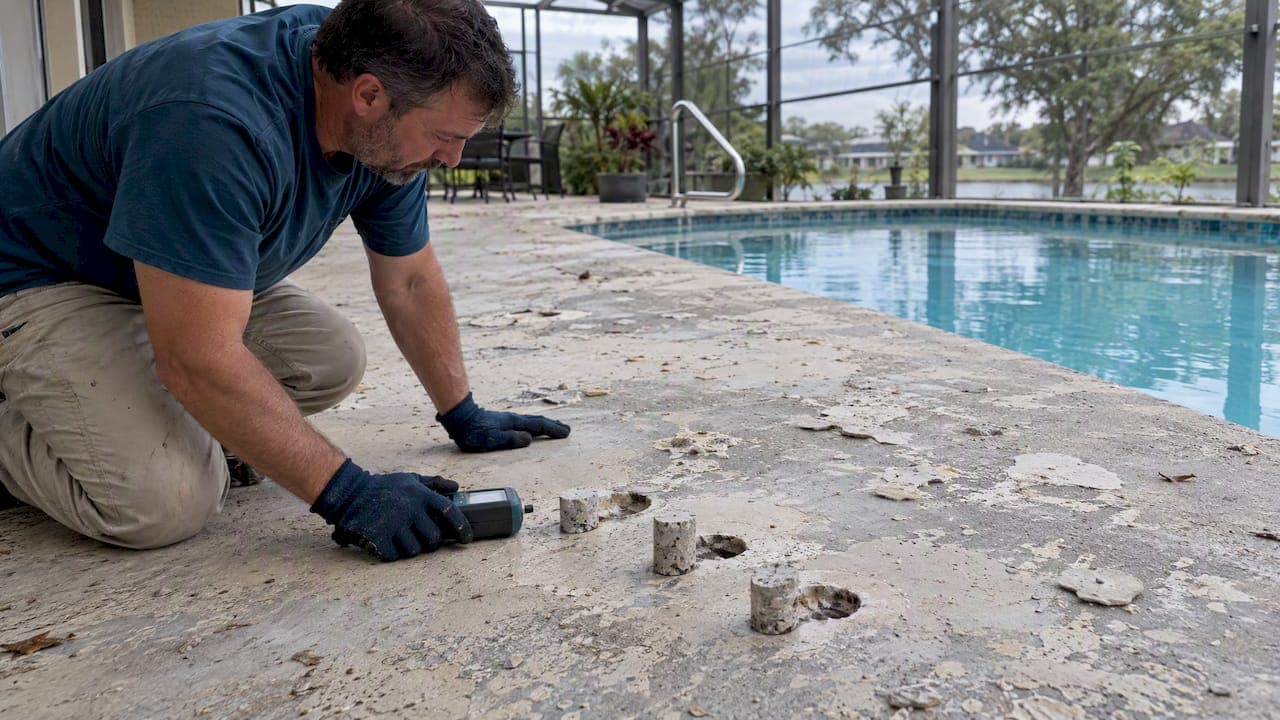
Most pool deck paint blisters trace back to trapped moisture migrating up through the concrete, so stop recoating and test the substrate before touching a brush again. A smaller share form fast, from solvent vapor expanding under a skinned-over coat on a hot surface. If the blisters are limited in number and the slab tests dry, a spot repair followed by a careful recoat will usually solve the problem.
TL;DR:
- Blistering caused by moisture migration often contains high salt concentrations, indicating the need to address the underlying water movement before repainting.
- Temperature or solvent blisters appear rapidly, usually within hours, and are linked to skinning over hot surfaces or thick coatings trapping vapor.
- Proper diagnosis involves removing loose paint, testing moisture levels with cores, and identifying if blisters are watery or glossy to determine cause.
- Preventative steps include thorough surface cleaning, acid etching, applying thin coats in optimal weather conditions, and waiting for adequate curing time before recoating.
- Persistent blisters, high moisture readings, or recurring failure in the same spots signal the need for structural repairs or substrate replacement rather than just recoat.
Table of Contents
- Causes: moisture-driven vs temperature or solvent blisters
- How to diagnose blistering before you repair anything
- Preventing blisters before you paint or recoat
- Repair workflow: fixing blisters and recoating correctly
- When to consider substrate repair or full replacement
- What years of pool deck restoration work have taught us
- Professional pool deck staining and enclosure restoration
- FAQ
- Sources
Causes: moisture-driven vs temperature or solvent blisters
Two mechanisms produce almost every blister you will see on a pool deck, and telling them apart matters because the fix is different for each. Moisture blisters build slowly as water moves through concrete by osmotic and capillary action, carrying dissolved salts toward the surface. Studies of blister fluid from failed coatings have found striking concentrations of these salts, which is strong evidence that moisture migration, not a bad batch of paint, is the root cause.
Blister fluid from failed coatings has tested at very high concentrations of sodium and potassium, concentrations that point directly to osmotic pressure pushing dissolved salts up through the slab, according to research on epoxy coating blisters.
Temperature and solvent blisters behave differently. They show up within hours of application, when solvent vapor gets trapped beneath a film that has skinned over on a hot surface, according to USDA Forest Products Laboratory research on temperature blistering. Several application habits raise the odds of either type:
- Applying paint too thick, which traps solvent and slows the coating's ability to breathe.
- Painting on a surface that is hot to the touch, which accelerates skinning before vapor can escape.
- Coating over chalk, salt residue, or pool chemical film left on the concrete.
- Using a product not rated for pool decks or high-pH masonry.
- Painting over a slab with unusually high surface pH from fresh concrete or chemical splash.
How to diagnose blistering before you repair anything
Diagnosis starts with your eyes. Blisters that appear within a day of painting and feel firm or glossy on the inside point to a temperature or solvent problem. Blisters that show up weeks or months later, especially ones that weep water when popped, point to ongoing moisture migration.
- Check the timing and texture. Note when the blisters appeared and whether the underside is watery (moisture) or dry and glossy (solvent).
- Test surface moisture. A handheld moisture meter gives a quick read, but for a reliable answer, drill a small core and place an in-situ relative humidity probe inside it, a method detailed in the USDA Forest Products Laboratory blistering report.
- Run a calcium chloride test on bare concrete to quantify moisture vapor emission before any new coating goes down.
- Check for salt residue and pH. A white, crusty film or a pH reading well above neutral suggests contamination that will keep undermining new coatings.
Pro Tip: If three or more cores across the deck show elevated internal humidity, treat it as a substrate problem, not a paint problem, and hold off on recoating until the moisture source is addressed.
Clean test results with only a handful of isolated blisters usually mean a spot repair will hold. Consistently high readings across the deck mean the moisture source needs attention first.
Preventing blisters before you paint or recoat
Good prep eliminates most of the conditions that cause blistering in the first place. Work through this sequence before any pool deck coating goes on:
- Remove all loose or flaking paint by scraping or sanding.
- Pressure wash to strip dirt, chalk, and algae from the surface.
- Scrub with a trisodium phosphate solution to cut oils and pool chemical residue.
- Acid etch or mechanically abrade bare or glossy concrete so the new coating can bond.
- Patch low spots or cracks, then rinse thoroughly and neutralize any acid residue.
- Allow the surface to dry fully, which pool coating technical guidance typically puts at two to three days after prep work, longer for new masonry.
Application conditions matter as much as prep. Painting outside the manufacturer's temperature window, commonly 50°F to 90°F, or within 5 degrees of the dew point, traps moisture and vapor under the film, according to Forest Products Laboratory application guidance. Our guide to weather conditions for pool enclosure painting and our note on keeping relative humidity below 65% before painting both cover this in practical terms.
A wet film of 4 to 6 mils per coat is the range most manufacturer guides recommend, rather than one thick application that traps solvent underneath.
Thin coats applied in the shade, with the manufacturer's recoat window respected between layers, cut blister risk sharply. New masonry often needs 7 to 30 days to cure before the first coat, and patched areas can need one to six weeks depending on the product used, per the same pool coating application guide. On decks with a history of high pH or persistent dampness, a moisture- or alkali-tolerant primer is worth the extra step, and a water-based acrylic topcoat is generally the safer choice where the manufacturer allows it.

Repair workflow: fixing blisters and recoating correctly
Once testing tells you whether you are dealing with isolated blisters or a widespread moisture problem, the repair itself follows a consistent sequence.
- Remove delaminated paint around each blister with a scraper or orbital sander.
- Cut and deflate larger blisters, then feather the edges so the patch blends into sound paint.
- Sand the exposed area to remove gloss and give the patch material something to grip.
- Clean thoroughly to strip dust, salt residue, and any remaining contamination.
- Patch low spots with hydraulic cement or a filler compatible with your topcoat.
- Prime if the substrate has high pH or a moisture history, then apply the topcoat in thin coats as outlined above.
Pro Tip: After the patch cures, re-test the area with a moisture meter before recoating. A clean reading confirms the repair is sound; a damp reading means the moisture source is still active.
Give patched areas the full cure time listed on the product before reopening the deck to foot traffic or refilling an adjacent pool, generally one to six weeks depending on the filler and climate. If blisters keep returning in the same spots after a proper repair, or if you are finding damp cores across multiple test locations, that is the signal to bring in a contractor rather than repeat the patch-and-paint cycle.
When to consider substrate repair or full replacement
Persistent moisture is the clearest sign that patching will not hold. Repeated blister failures in the same areas, consistently high relative humidity readings in core tests, or a known source like a leaking pipe or high groundwater all point past cosmetic repair toward structural work.
- Spot repair: addresses isolated blisters with clean moisture tests, the lowest cost and shortest timeline.
- Full strip and recoat: needed when blistering is widespread but the substrate itself tests dry.
- Substrate remediation or replacement: required when moisture sources are active below the slab, since no coating will hold until that is resolved.
Fixing the underlying moisture problem once, rather than repainting over it repeatedly, is what makes a new coating last. Our article on pool deck paint peeling walks through related failure patterns worth checking against your own deck.
What years of pool deck restoration work have taught us
The blisters we see most often on service calls trace back to two habits: skipping the acid etch step and recoating over a deck that was still damp from a recent rain or pool splash-out. Both are easy to avoid once you know to test first. We use water-based acrylic coatings and stainless fasteners because they hold up against the moisture and chemical exposure that cause most of these failures.
— Michel
Professional pool deck staining and enclosure restoration
When a deck keeps blistering despite careful prep, or when the surrounding pool enclosure is rusted and weathered alongside it, a professional restoration often makes more sense than another DIY attempt. We handle pool deck staining with water-based acrylic systems matched to the substrate's condition, plus pool screen restoration that replaces corroded fasteners with stainless steel hardware.

DIY repair works well for a handful of clean, well-tested blisters. Once moisture testing shows a wider problem, or the enclosure itself needs attention, our crews bring the substrate prep, coating systems, and warranty-backed process that a one-off patch job cannot match. Reach out through our project gallery to see completed work, or get in touch through Mrpoolscreen to schedule an assessment.
FAQ
Why is the paint on my deck bubbling?
Bubbling paint on a pool deck is almost always moisture working its way up through the concrete, carrying dissolved salts that build pressure under the coating. A smaller number of cases come from solvent vapor trapped under paint applied on a hot surface, according to USDA Forest Products Laboratory research.
Why is my outdoor paint bubbling?
Outdoor paint bubbles for the same two reasons regardless of surface: moisture moving through the material underneath, or solvent vapor trapped beneath a coat applied too thick or in direct sun. Sherwin-Williams troubleshooting guidance also points to dew settling on an uncured film as a contributing cause.
How long does pool deck paint take to dry?
Dry times vary by product, but many pool coating systems need two to three days of surface drying after prep work before the first coat goes on, per pool coating application guidance. Full cure before heavy use or refilling an adjacent pool can take longer depending on the specific product.
Why is my Sherwin-Williams paint bubbling?
Sherwin-Williams attributes blistering to heat, moisture moving through the substrate, or dew forming on paint that has not fully cured, and recommends identifying the specific cause before attempting a repair. Their troubleshooting page outlines matching the fix, whether that is a primer change or better moisture control, to the cause.
How do I fix paint blisters without repainting the whole deck?
When moisture and salt tests come back clean and blisters are limited to a few spots, cutting out the loose paint, sanding, patching, and recoating just that area is usually enough. Widespread or recurring blisters despite clean spot repairs are a sign the moisture source needs addressing before any recoat will hold.
Sources
- Blistering of epoxy coatings and concrete floor studies
- Wood finishing: temperature blistering of house paints (USDA Forest Products Lab)
- Epoxy pool paint application guide (Lincoln Aquatics)
- Sherwin-Williams troubleshooting: blistering