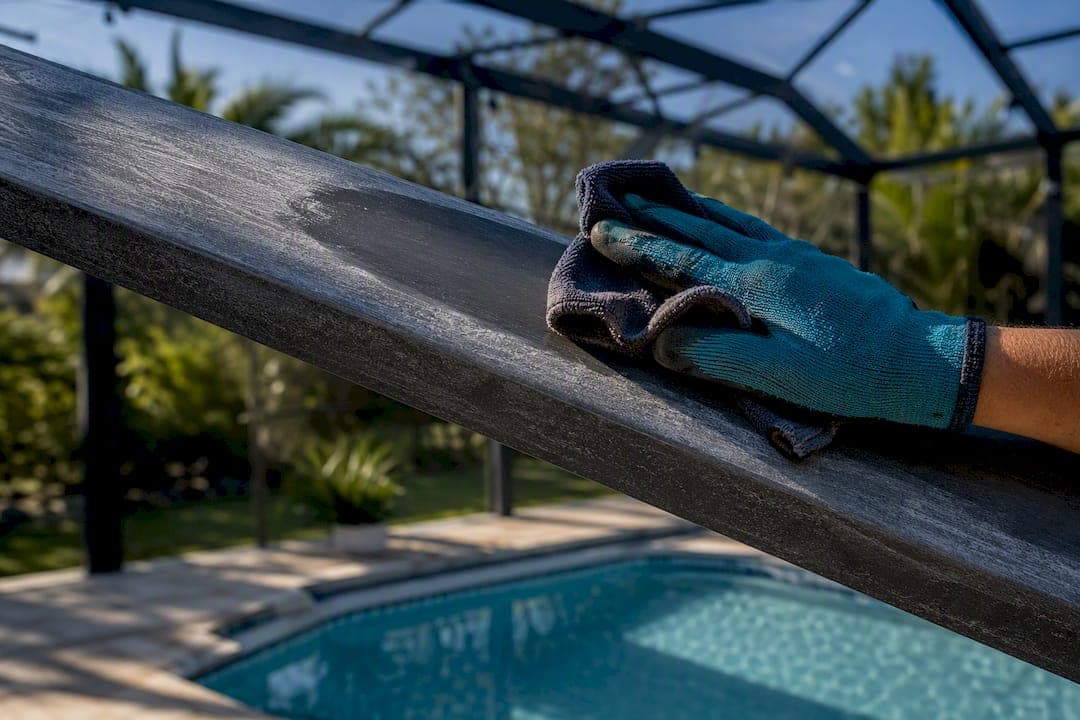
Most chalky, oxidized aluminum pool cage paint can be restored, but only if the metal underneath isn't pitted. Run a quick wipe or tape test first. If chalk lifts off easily and the surface underneath is solid, you're looking at a cleaning and priming job, not a replacement. If paint flakes away and exposes pitted or corroded metal, skip the touch-up plan and start weighing a full restoration instead.
TL;DR:
- A chalky, powdery surface indicates oxidation, which can often be fixed with cleaning and repainting if the underlying metal remains intact.
- Pressure washing, chemical restorers, and light sanding are essential prep steps; skipping these increases the risk of early paint failure due to poor bonding.
- Repainting is appropriate when chalk is removable and the aluminum shows no pitting or corrosion; extensive pitting or structural damage require professional restoration.
- The choice of primer and paint should be based on their ability to bond to aluminum and withstand salt, chlorine, and UV exposure, with lighter colors aging more gracefully.
- Complex or severely corroded cages, especially multi-story or heavily pitted ones, should be handled by professionals due to safety concerns and the need for thorough repair.
Table of Contents
- What Is Chalky Pool Cage Paint, and How Do You Diagnose It?
- How Do You Clean and Prep a Chalky Cage Before Repainting?
- Should You Touch Up, Repaint, or Restore the Whole Cage?
- Which Primers and Paints Actually Bond to Aluminum?
- What Equipment and Technique Give the Best Application Results?
- What Mistakes Shorten a Repaint's Life the Most?
- How Does a Professional Restoration Actually Work?
- Why Diagnosis Matters More Than the Paint You Pick
- When Does It Make Sense to Hire a Pro Instead of DIY?
- Sources
What Is Chalky Pool Cage Paint, and How Do You Diagnose It?
Chalking is oxidation, and it's the number one aging symptom on Florida pool cages. UV exposure, humidity, and salt air break down the resin binder in the paint film until it turns into a powdery residue that rubs off on your hand, your clothes, or a pool towel left against the frame. It's cosmetic, and in most cases it's fixable. Corrosion and coating failure are a different problem entirely.
Here's how to tell them apart without guesswork:
- Chalk/rub test: Wipe a section of frame with a dry cloth or your thumb. If a powdery residue transfers, that's oxidation.
- Tape adhesion test: Press a strip of tape onto a painted section, then pull it off. If paint comes with it in flakes, the coating has already failed and cleaning alone won't fix it.
- Cross-hatch check: On a suspect area, score a small "X" through the paint down to metal. If edges lift or crumble, adhesion is already compromised.
- Visual scan of failure points: Check fastener heads, welded joints, screen track corners, and any south or west facing elevation that takes the most sun. These fail first.
- Bare-metal exposure: Flaking that reveals white, crusty aluminum underneath (not shiny bare metal) signals corrosion, not simple oxidation.
Chalking that wipes away and leaves a hard, intact coating underneath is a strong sign your enclosure just needs aggressive cleaning and a proper repaint. Pitting, visible white corrosion crust on the aluminum itself, or paint that peels in sheets rather than powders is a different story. That points toward structural issues that a rattle can or a weekend DIY project won't resolve, and it's worth reading up on why paint peels on aluminum enclosures before you decide your next move.
How Do You Clean and Prep a Chalky Cage Before Repainting?
Skipping this stage is the single biggest reason repaints fail early. Chalk acts as a bond breaker between the old surface and new paint, so anything you spray or roll on top of unremoved oxidation is going to lift and peel within a season or two, no matter how good the paint is.
Work through prep in this order:
- Rinse and detergent wash first. A garden hose and a mild detergent solution knock down surface dirt, pollen, and loose grime, but soap alone almost never removes true chalking. Treat this as step one, not the finish line.
- Pressure wash at a controlled distance. Use 1,500 to 2,000 PSI with a fan tip held 12 to 18 inches from the frame at a slight downward angle. Too close or too much pressure can dent thin aluminum extrusions or blow water into screen tracks.
- Let it dry fully. Give the frame at least 24 hours in dry weather before moving to chemical or mechanical treatment. Trapped moisture under primer is a fast path to blistering.
- Apply an oxidation cleaner or restorer. Aluminum-safe chemical restorers dissolve stubborn chalk that pressure washing alone won't lift. Follow the dwell time on the label and rinse thoroughly. Leftover residue will contaminate your primer coat.
- Sand or abrade to bare metal at trouble spots. Use a fine abrasive pad or 220 to 320 grit sandpaper on any area where chalking was heavy or where the tape test showed lifting. You're creating a mechanical profile the primer can grip, not stripping the whole frame.
- Etch where needed. Bare aluminum is naturally slick, so a self-etching primer or a dedicated etching solution gives new coating something to bite into, which matters more on aluminum than almost any other prep step.
Pro Tip: Mask pool water, screens, and glass before you spray anything, even a cleaner. Overspray from an oxidation restorer can etch glass and stain screen mesh, and that cleanup often costs more time than the paint job itself.
Wear gloves and eye protection at minimum when handling chemical restorers, and add a respirator if you're sanding old paint that could contain lead on an older enclosure.
Should You Touch Up, Repaint, or Restore the Whole Cage?
Not every chalky cage needs the same fix, and choosing the wrong scale of work either wastes money or leaves you repainting again in two years.
- Touch-up fits isolated scratches, small chips, or a single corroded fastener area. Clean, feather-sand the edges, spot-prime bare metal, and blend in matching topcoat. This works when 90% of the finish is still sound.
- Full spray repaint makes sense when chalking is widespread across the whole structure but the aluminum itself is solid, with no pitting and no structural rust bleeding through joints. This is the most common scenario for cages over 8 to 10 years old.
- Professional restoration or panel replacement becomes necessary once you see pitted aluminum, corroded structural joints, or fasteners that have rusted through the frame itself. At that point, paint is cosmetic and won't address the underlying failure.
Budget shifts hard between these three routes. Touch-ups run cheap, materials only. A full repaint adds masking labor, fastener replacement, and enough paint volume to matter, so it's worth checking local pricing before committing to a DIY weekend. See what the cost of a full repaint can vary. before you commit to a DIY weekend. Restoration work costs more up front but resets the clock on a structure that would otherwise need full rebuilding within a few years.
Which Primers and Paints Actually Bond to Aluminum?
Not every can labeled "outdoor metal paint" is built for a pool cage. Salt exposure, chlorine off gassing, and constant UV punish coatings faster than a fence or a gutter ever will, so the label matters here.
Four coating families show up in real specifications for aluminum cages:
- DTM (direct-to-metal) acrylic topcoats balance UV resistance and chemical tolerance, and they're the most common choice for water-based residential repaints.
- Epoxy primers deliver strong adhesion and chemical resistance as a base coat, though they're rarely left exposed as a topcoat because UV breaks them down over time.
- Polyurethane topcoats add extra abrasion and UV resistance where budget allows, often on higher-end or commercial jobs.
- Powder coating is a factory or shop process, not a field application, but it's worth knowing about as the most durable option when panels come off-site for refinishing.
Look for products specifically labeled for aluminum or non-ferrous metal with UV inhibitors built in. High-solids industrial sprays formulated for outdoor metal hold up longer than a general-purpose exterior paint pulled off a hardware store shelf.
Color matters more than most homeowners expect. Very dark colors absorb more heat and show salt residue and water spotting faster in high-UV pool zones, so lighter bronzes and mid-tone finishes tend to age more gracefully and hide chlorine staining between washes. The build sequence that holds up best: spot-prime any bare metal you sanded down, then apply two full, light coats of topcoat rather than one heavy coat. Thin, even coats level out better and avoid the sagging and uneven film thickness that cause early cracking.
What Equipment and Technique Give the Best Application Results?
Spray technique separates a repaint that lasts a decade from one that starts flaking in two years, and this is where most DIY jobs lose ground to professional work.
- HVLP or air-assisted sprayers atomize the coating finely enough to wrap around the narrow, multi-faceted aluminum members that make up a cage frame, something a brush or roller physically can't reach on the backside of extrusions.
- Stage your masking before you spray, not as you go. Cover screens, glass, tile, and pool water fully, then work section by section so overspray from one area doesn't recontaminate a section you already cleaned.
- Keep the gun moving in overlapping passes, roughly 50% overlap, at a consistent distance from the surface. Pausing or holding the trigger too long in one spot causes runs on vertical members.
- Brush and roller work is fine for tight touch-ups around fasteners or small chipped areas where a sprayer would waste more paint through overspray than it saves in time.
- Respect cure windows. Most acrylic topcoats need moderate temperatures and humidity below label thresholds between coats. Painting in direct midday Florida heat or right before a rain shower is one of the most common ways a repaint fails within months.
Pro Tip: If you're spraying on a breezy day, expect drift. A 10 mph crosswind can carry overspray onto a neighbor's car or your own pool deck faster than you'd think, so check the forecast before you commit to a spray day over a brush day.
For a full walkthrough of masking sequence and dry times, see this repaint guide before you start.
What Mistakes Shorten a Repaint's Life the Most?
The failures are predictable, and they repeat across almost every botched DIY job:
- Painting directly over chalk without removing it first, which sets up the new coat to peel within a season.
- Skipping primer on bare or sanded metal, assuming the topcoat alone will bond.
- Reusing rusted steel screws instead of upgrading to stainless steel or Nylotech hardware, which stains the fresh paint and can trigger galvanic corrosion against aluminum.
- Spraying in high humidity, direct sun, or right before rain.
- Incomplete masking that lets overspray land on screens or pool water.
A simple annual routine keeps a repaint looking good for years: wash the frame yearly, touch up small chips as soon as you spot them, and inspect fasteners and joints each spring for early rust bleed. DTM acrylic systems generally hold up well for multiple years under Florida sun before chalking returns; polyurethane and powder coat options tend to provide longer-lasting protection. Watch for the first hint of chalk showing back up as your signal to start planning the next repaint, not react to it.
How Does a Professional Restoration Actually Work?
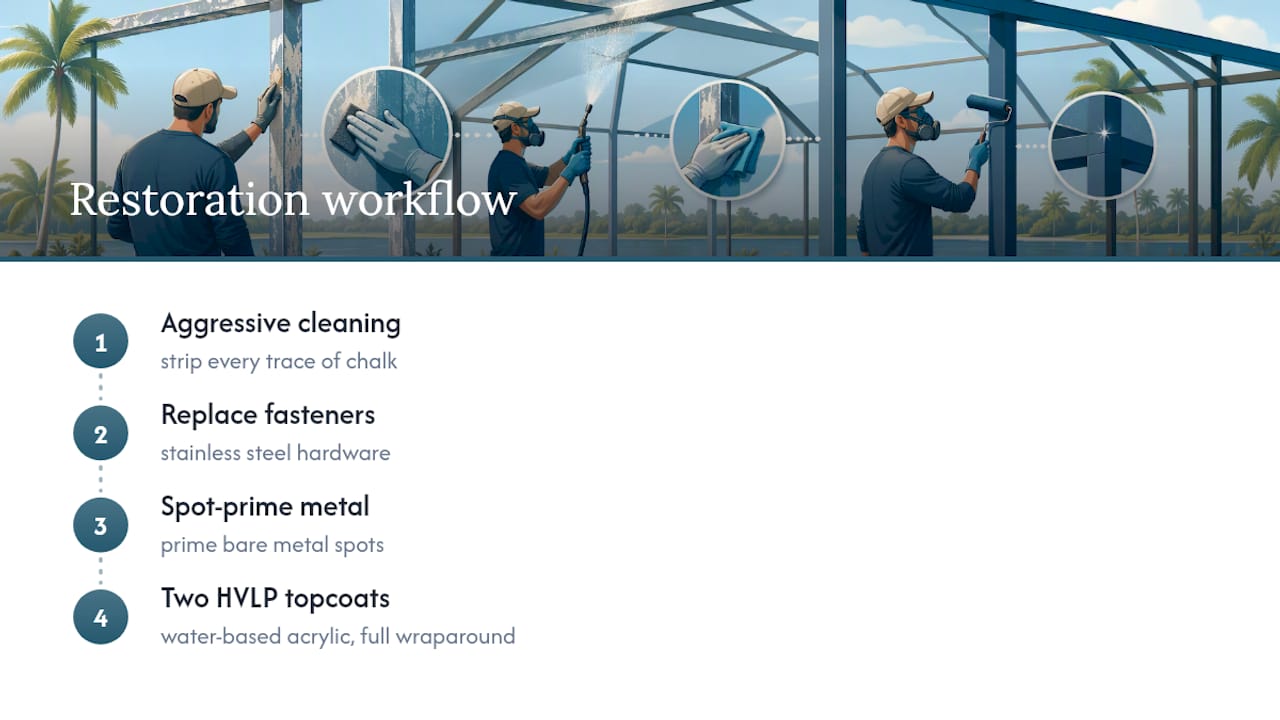
A typical Mrpoolscreen-style restoration workflow starts with aggressive cleaning to strip every trace of chalk, followed by replacing corroded fasteners with stainless steel hardware before any paint goes on. Bare metal spots get spot-primed, then the whole frame receives two full coats of water-based acrylic topcoat applied by HVLP for even film thickness and full wraparound coverage on every extrusion face.
This approach typically runs well below the cost of a full cage rebuild, and documented before-and-after photos are standard practice for a legitimate restoration job. When you're comparing estimates, ask for a materials list, a fastener replacement plan, and a written warranty. A contractor who can't show past project photos or specify the primer and topcoat by name is one to question closely.
Why Diagnosis Matters More Than the Paint You Pick
Most guides jump straight to paint brand recommendations, and that's backwards. The paint matters, but it's the last decision in the chain, not the first. What actually determines whether a repaint lasts three years or ten is whether the chalk got fully removed and whether the metal underneath was sound enough to hold a coating in the first place.
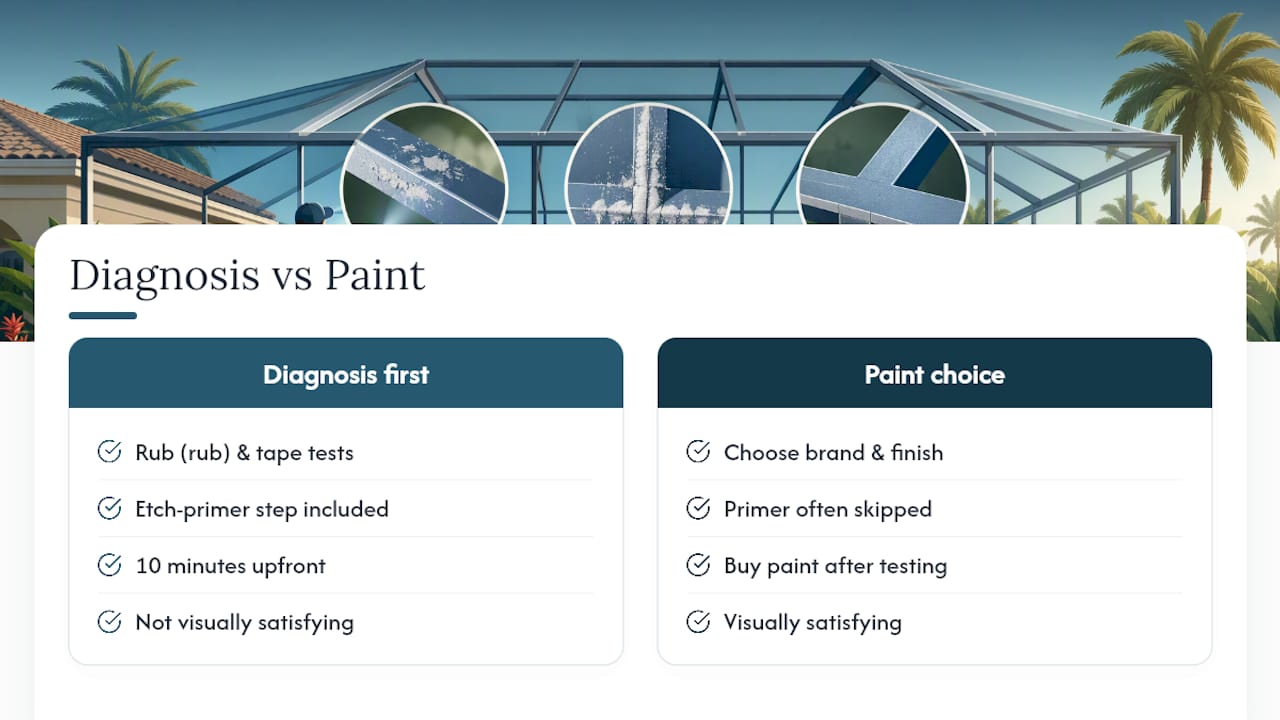
Conventional DIY advice underweights the tape adhesion test and the etch primer step, probably because they're less visually satisfying than watching fresh color go on. But skipping them is exactly why so many repaints fail inside 18 months, chalk breaking the bond between old and new coating from underneath, invisible until it starts flaking.
If you take one thing from this guide, prioritize the diagnosis over the product. Spend the ten minutes on the rub test and the tape test before you buy a single can of paint. That single decision, more than any brand or finish, determines whether your next repaint is a ten-year fix or a two-year redo.
— Michel
When Does It Make Sense to Hire a Pro Instead of DIY?
Some professional restoration services handle pool cages that DIY repaints can't address safely or economically, often at a fraction of what a full rebuild costs. If your cage is multi-story, shows heavy pitting across large sections, or requires ladder or roof access to reach upper panels, that's the point where hiring a pro stops being optional and starts being the safer, cheaper path.

A solid estimate should spell out fastener replacement with stainless steel or Nylotech hardware, spot-priming on exposed metal, a two-coat spray finish, full masking of screens and glass, and site cleanup when the job wraps. Ask to see documented project photos before you sign anything. Mrpoolscreen's project gallery shows real before-and-after results from past restorations, and it's a useful benchmark for what a properly prepped and coated cage should look like when the work is done right. If your cage checks any of the "hire a pro" boxes above, request a restoration estimate and get a firm scope of work before committing to a repaint that a DIY approach might not fix for good.
Sources
- Best Paint for Aluminum Pool Cage: Durable Coatings for Outdoor Aluminum Structures – Poolurchin
- HVLP architectural and industrial coating (NewFinishes)
- Pool Cage Painting Guide When to Repaint, Prep Steps and Durable Finish Options